Samples measured by the AccuPyc should occupy more than 10 percent of the measured cell volume for the most accurate results. This can be difficult to obtain if a low sample quantity is available or if the sample bulk density is low.
The cell volume is determined through the volume calibration process and is dependent on the volumes of the AccuPyc sample chamber and sample cup. There are two methods that can be used to lower the cell volume, therefore increasing the sample occupancy percentage.
Method 1: Using chamber inserts
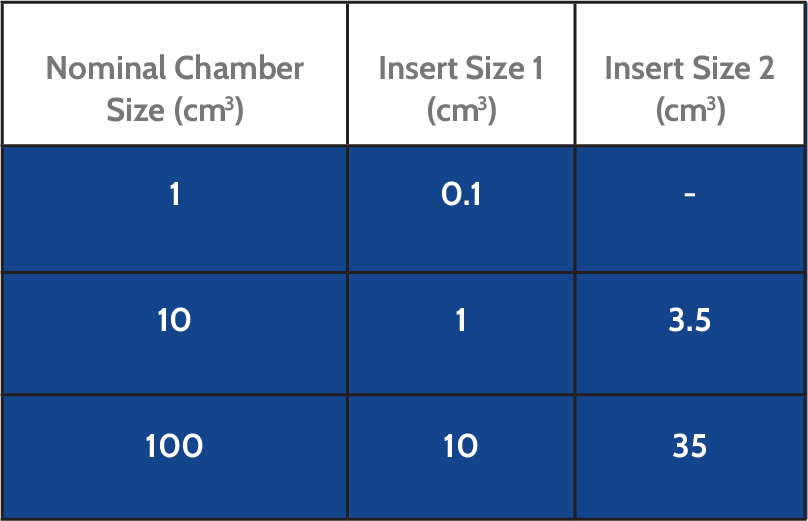
Chamber inserts consist of an aluminum cylinder and a lower-volume sample cup. The aluminum cylinder occupies a region of the sample chamber which reduces the cell volume and acts as a holder for the new lower-volume sample cup. Before starting an analysis with a chamber insert, a volume calibration must be performed with the insert. Available insert sizes are listed in Table 1.

Method 2: Using calibration spheres
Cell volume can be reduced by using a non-porous sample with a known volume. The calibration spheres are ideal for this method since the volumes are well known and traceable. Analyses are performed with both the calibration sphere and the sample of unknown density. The following steps must be performed before starting an analysis on the AccuPyc when using this method.
- Perform a volume calibration using the standard sample cup size to obtain the measured cell volume.
- Record the volume of the calibration sphere. If using a non-porous material that is not the calibration sphere and the volume is unknown, perform an analysis to determine the volume.
- Subtract the calibration spheres volume, or that of the non-porous material, from the measured cell volume.
- Enter the new calculated cell volume into the appropriate location. Cell volume can be found in the following locations:
- Windows software – Unit menu -> Calibration -> Calibrate Volume
- Keypad software – Set Up -> Calibration Data
Method Comparison
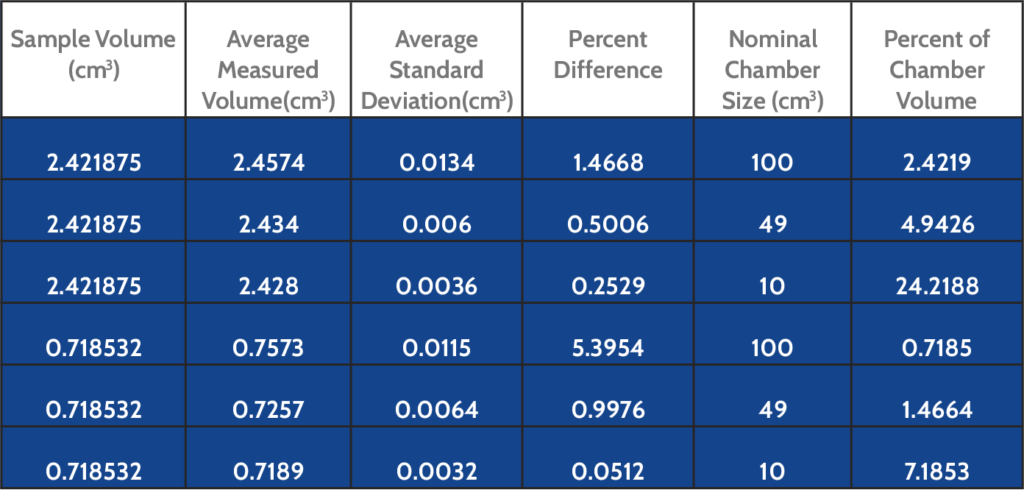
Analyses were performed on a 100 cm3 AccuPyc using the standard sample cup, a 10 cm3 insert for the first method, and the calibration spheres (approximately 51 cm3) that come with the unit for the second method. Data was collected for two separate calibration spheres, with volumes 2.421875 cm3 and 0.718532 cm3. The calibration spheres used for this experiment are a non-porous tungsten carbide alloy. Table 2 shows the averages of the data collected.

The measured sample volume becomes more accurate as the percent of the chamber volume occupancy increases. The sample material for this experiment is non-porous. The difference between the true and measured volume should be expected to be greater when porous materials are analyzed since the bulk volume of the sample is greater than its skeletal volume due to the open porosity